|
|
||
|---|---|---|
| .. | ||
| Media | ||
| Script | ||
| VSCode-Extension | ||
| WASM-Debug-Server/Docker | ||
| WASM-Toolchain/Docker | ||
| .gitattributes | ||
| README.md | ||
WAMR-IDE (Experimental)
Introduction
The WAMR-IDE is an Integrated Development Environment to develop WebAssembly application with coding, compiling and source debugging support. It contains 3 components: VSCode extension, wasm-toolchain docker image and wasm-debug-server docker image.
-
VSCode extensionis anvscodeextension, with which user can build and manage projects, developwasm application, includingbuilding,runninganddebugging. -
WASM-toolchainis a docker image which provides building environment for wasm. -
WASM source debug serveris a docker image which provides running and source debugging environment for wasm application.
How to setup WAMR IDE
Note: Please ensure that the scripts under resource directories have
execution permission. While on git they have x bits, you might have dropped
them eg. by copying them from Windows.
Similarly, do not drop execution permission when copying lldb binaries
under resource/debug/bin.
1. Install VSCode on host.
- make sure the version of vscode you installed is at least 1.59.0
2. Install Docker on host.
1. [Windows: Docker Desktop](https://docs.docker.com/desktop/windows/install/)
2. [Ubuntu: Docker Engine](https://docs.docker.com/engine/install/ubuntu)
   ```xml
   OS requirements:
   To install Docker Engine, you need the 64-bit version of one of these Ubuntu versions:
   - Ubuntu Impish 21.10
   - Ubuntu Hirsute 21.04
   - Ubuntu Focal 20.04(LTS)
   - Ubuntu Bionic 18.04(LTS)
   ```
3. Load docker images from the release tar file or build docker images on the host
3.1 Load docker images from the release tar file
From now on, for each release, we have the same version tagged docker image saved as a tar file, which you can find and download in the release.
You could download the tar archive files for docker images from the release, and then load them using the following commands:
# download the zip or tar.gz from release depending on your platform
# decompress and get the tar file

# on Linux/MacOS, you could use tar
tar xf wasm-toolchain-{version number}.tar.gz
tar xf wasm-debug-server-{version number}.tar.gz
# or you could use unzip
unzip wasm-toolchain-{version number}.zip
unzip wasm-debug-server-{version number}.zip
# load wasm-toolchain
docker load --input wasm-toolchain.tar
# load wasm-debug-server
docker load --input wasm-debug-server.tar

# on Windows, you could use any unzip software you like
# then loading docker images using powershell or git bash
# load wasm-toolchain
docker load --input ./wasm-toolchain.tar
# load wasm-debug-server
docker load --input ./wasm-debug-server.tar
3.2 Build docker images on host
We have 2 docker images which should be built or loaded on your host, wasm-toolchain and wasm-debug-server. To build these 2 images, please enter the WASM-Debug-Server/Docker & WASM-Toolchain/Docker, then execute the build_docker_image script respectively.
Windows (powershell):
$ cd .\WASM-Toolchain\Docker
$ .\build_docker_image.bat
$ cd .\WASM-Debug-Server\Docker
$ .\build_docker_image.bat
Linux:
$ cd ./WASM-Toolchain/Docker
$ ./build_docker_image.sh
$ cd ./WASM-Debug-Server/Docker
$ ./build_docker_image.sh
After building, you can find wasm-toolchain and wasm-debug-server docker images on your local

If building docker images fail during the process
Sometimes building the Docker images may fail due to bad network conditions. If the wasm-toolchain and wasm-debug-server images do not exist after building, please build them manually. Fix the proxy setting if needed and execute the following command to build docker images.
Note: please correctly replace example proxy address with your own before you run manually.
$ cd .\docker_images\wasm-debug-server
$ docker build --no-cache --build-arg http_proxy=http://proxy.example.com:1234
--build-arg https_proxy=http://proxy.example.com:1234 -t wasm-debug-server:1.0 .
$ cd .\docker_images\wasm-toolchain
$ docker build --no-cache --build-arg http_proxy=http://proxy.example.com:1234
--build-arg https_proxy=http://proxy.example.com:1234 -t wasm-toolchain:1.0 .
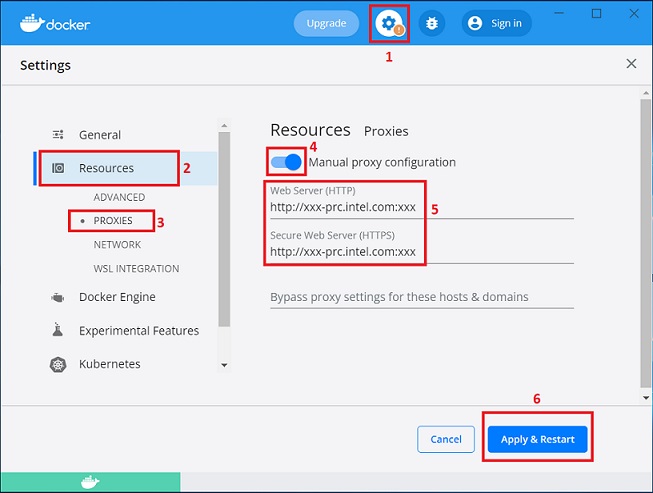
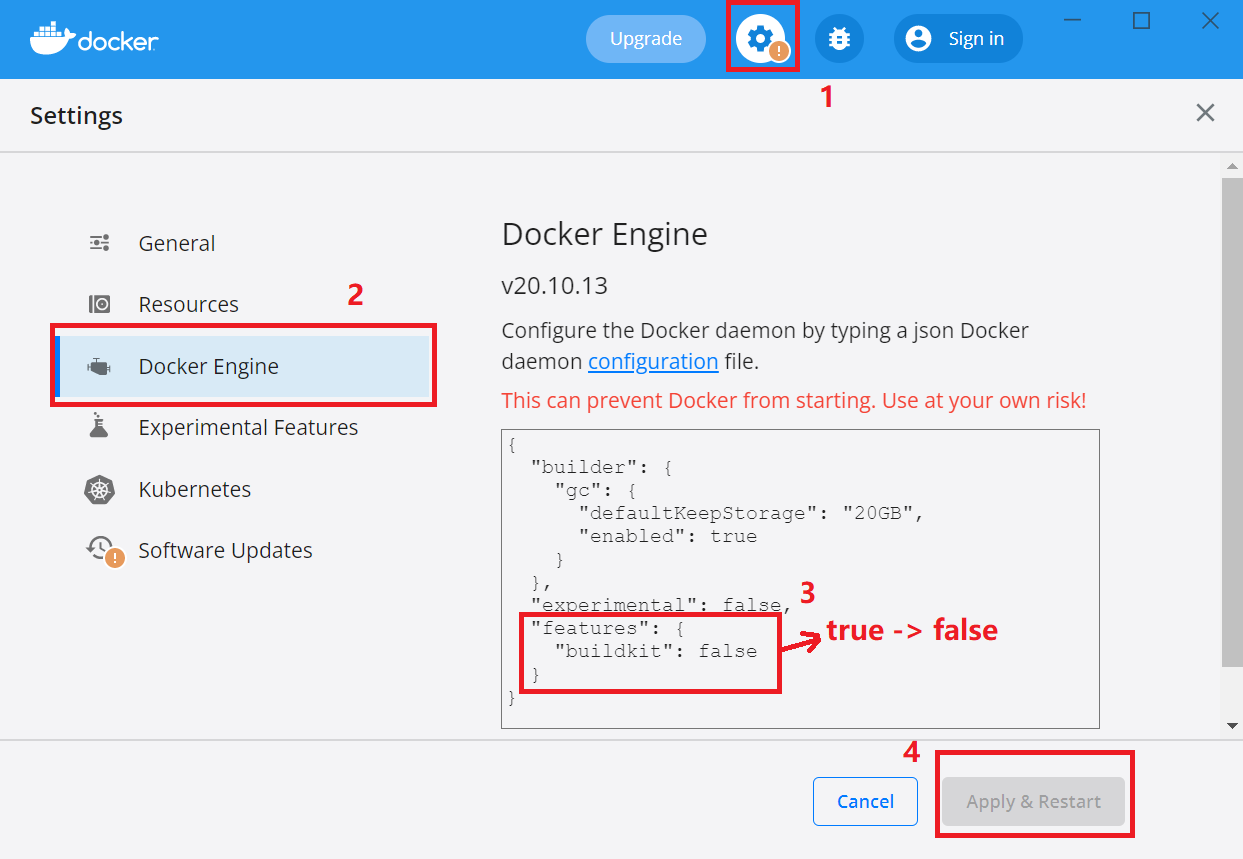
If you encounter the problem failed to solve with frontend dockerfile.v0: failed to create LLB definition, please config your docker desktop
Points To Remember
- Make sure that the
wasm-toolchain:1.0andwasm-debug-server:1.0docker images are both successfully built before usingWAMR IDE, otherwiseBuild,RunandDebugwill not work.
4. Generate wamride extension package file
wamride-1.0.0.vsix can be packaged by npm vsce.
$ npm install -g vsce
$ cd VSCode-Extension
$ rm -rf node_modules
$ npm install
$ vsce package
Note that patched lldb should be built and put into the VSCode-Extension/resource/debug folder before your package or extension debug process if you want to enable source debugging feature.
Please follow this instruction to build lldb.
Please follow this instruction
to copy the binaries.
You can also debug the extension directly follow this instruction without packing the extension.
5. Install extension from vsix

select wamride-1.0.0.vsix which you have packed on your host.
How to use wamr-ide
WAMR-IDE extension contains 2 components as following picture showing. WAMR IDE for workspace and project management and Current Project for project's execution.

Project Execution
1. New project
When you click New project button, the extension will pop up a message box at the bottom right of the screen as following:

You can click Set up now and select the target folder to create project workspace, or you click Maybe later to close the message box.
Note that your selected workspace folder should be empty or the folder you have set up as workspace.
After setting up workspace, extension will prompt successful message:
Workspace has been set up successfully!
Then click New project button again, a new page will show as following.

Enter the Project name and select the Template, then click Create button. A new project will be generated and opened in your current VS Code window or in a new VS Code window.
Opening in current windows or a new one depends on whether your
vscode's exploreris empty or not. If empty, open in current window, or open in the new vscode window.
A new initialized project is as following picture shows.

.wamr is the project configuration folder which contains 3 files, CMakeLists.txt, project.cmake, and compilation_config.json. CMakeLists.txt is used to build wasm target and the project.cmake is included in CMakeLists.txt. compilation_config.json includes the user's customized configuration such as folders which should be added in the include path.
2. Open project
Click Open project button, quick-pick-box will show as following. All projects under your current workspace will be shown and can be selected.

3. Change workspace
Click Change workspace button, a dialog will show as following. You can select 1 folder in file system as workspace, and the new workspace path will override previous workspace, and all new created projects will be generated in the new workspace.

4. Customize include paths and exclude source files
Extension supports adding header file folder to `include path` and excluding source file from build.
-
Add to include path- Move the cursor to the
folderand right click, thenmenuswill be shown as following. ClickToggle state of path including.

- Move the cursor to the
-
Exclude source file from build- Move the cursor to the
source fileand right click, thenmenuswill be shown as following. ClickToggle state of excluding.

After setting up
include pathandexclude files, the corresponding folder and files will be decorated with color and icon as following picture shows.
At the same time, all added
include pathandexclude fileswill be saved in.wamr/compilation_config.jsonas json array.
- Move the cursor to the
Toggle state of path includingjust shows when selectingfolderand hides with other resources.
Toggle state of excludingjust shows when selecting[.c | .cpp | .cxx] source filesand hides with other resources.
Current Project Management
1. Configuration
Click Configuration button, a new page will be shown as following. You can config building target with Include paths, Initial & Max linear memory, stack size, exported_symbols and include paths, exclude files.

Then click Modify button to confirm, if configurations are modified successfully and following message will pop. Click OK, the page will be auto closed.

And all configuration will be saved in .wamr/compilation_config.json.

2. Build
When you have completed coding and ready to build target, click build button and the wasm-toolchain will auto start a container and execute the building process.

After successful building execution, build folder will be generated in explorer, in which ${output_file_name}.wasm is exist.

Note that to start
docker servicefirstly.
3. Run
Click Run button and wasm-debug-server docker image will auto start a container and execute the running process.

4. Debug
Click Debug button will trigger start ip wamr-debug-server docker image, and boot up lldb debug server inside of iwasm. Then start a debugging session with configuration to connect. Tap F11 or click step into to start debugging.

Docker containers will be auto stopped and removed after the execution.